Home » How to Wire a Three Pin Plug: A Step-by-Step Guide for Safe Electrical Connections
Learn how to wire a three-pin plug easily and safely with our detailed guide. Follow our step-by-step instructions to ensure secure and reliable electrical connections for your appliances. Perfect for DIY enthusiasts in Ireland!


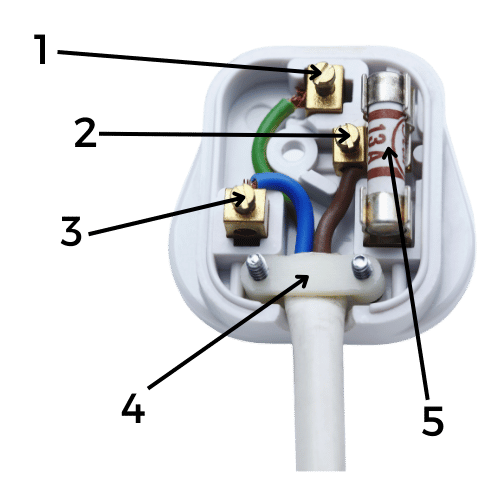
Wiring a three-pin plug is a valuable skill, particularly in Ireland where ensuring electrical safety is paramount. This guide will provide you with detailed steps, using the numbered sections from the image to help you wire a three-pin plug properly.
Materials Needed:
Before you begin, ensure you have all the necessary tools and components. You will need a three-pin plug, a screwdriver, and wire strippers. Ensure the plug is compatible with the appliance you’re wiring.
Use a screwdriver to unscrew the plug cover. Most plugs have a single screw in the centre. Once unscrewed, carefully remove the cover to expose the internal components.
If the cable isn’t already stripped, use wire strippers or a knife to remove about 5cm (2 inches) of the outer insulation, exposing the inner wires. Be careful not to cut through the wires inside.
Inside the cable, you’ll find three wires: brown (live), blue (neutral), and green/yellow (earth). Strip about 1cm (0.4 inches) of insulation from each wire, exposing the bare metal.
Using the numbered sections from the image, follow these steps to connect the wires correctly:
Earth (Green/Yellow Wire) – Section 1
Live (Brown Wire) – Section 2
Neutral (Blue Wire) – Section 3
Secure the Cable – Section 4
Check the Fuse – Section 5
Once all the wires are connected and secured, replace the plug cover and screw it back in place. Ensure the cover is tightly secured and there are no gaps.
Before plugging in your appliance, double-check all connections to ensure they are tight and secure. It’s also a good idea to test the plug with a continuity tester if you have one.
By following these steps and using the numbered sections from the image, you can confidently wire a three-pin plug, ensuring a safe and reliable connection for your appliances. Remember, safety first—always double-check your work to prevent any electrical hazards.

Leading provider of nationwide electrical services. Licensed, insured, and committed to excellence in every project.